Using an even smaller keyboard
Last time I discovered the wonderful world of QMK and keyboard firmware customization. If you remember, we went onto how important it is to feel comfortable using your keyboard, specially when it’s your work tool. I teased this post with a question that said: “could I go even smaller?”. And so, even smaller I went.
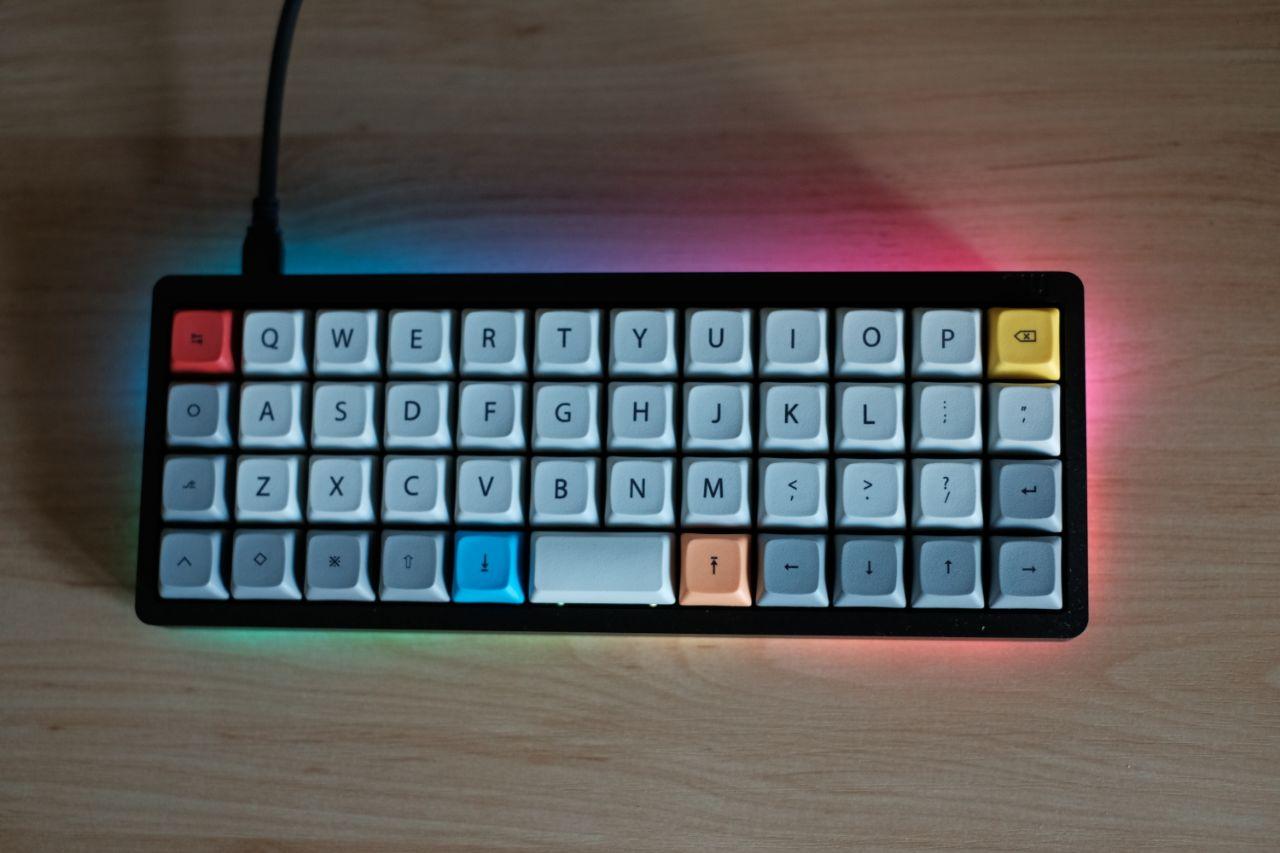
40% ortholinear keyboard
This is my new keyboard, it’s a 40% ortholinear keyboard and it’s my new daily driver. I use it for everything. Say gaming, programming, text editing… EVERYTHING
I’ve been using it for a couple of months and I’m totally used to it. There were some habits I had to change but it’s all good now.
A 40% keyboard is called like that because it’s roughly 40% the size of a full sized keyboard, those being the ones with arrows and a numpad. Many people think that going smaller means losing functionality, and while it’s what it seems like when you look at a keyboard so small it’s not true at all. There is a really good saying that goes: “On a full sized keyboard your fingers move to the keys while in a 40% keyboard the keys move towards you.” My keyboard in particular has 47 keys, and I would never thought that I’d say this but there are some keys that I’m not using. It’s not about the number of keys, it’s about how you use them. And having the possibility of programming the functionality of each key has made me realize that I need no more than a 40% keyboard.
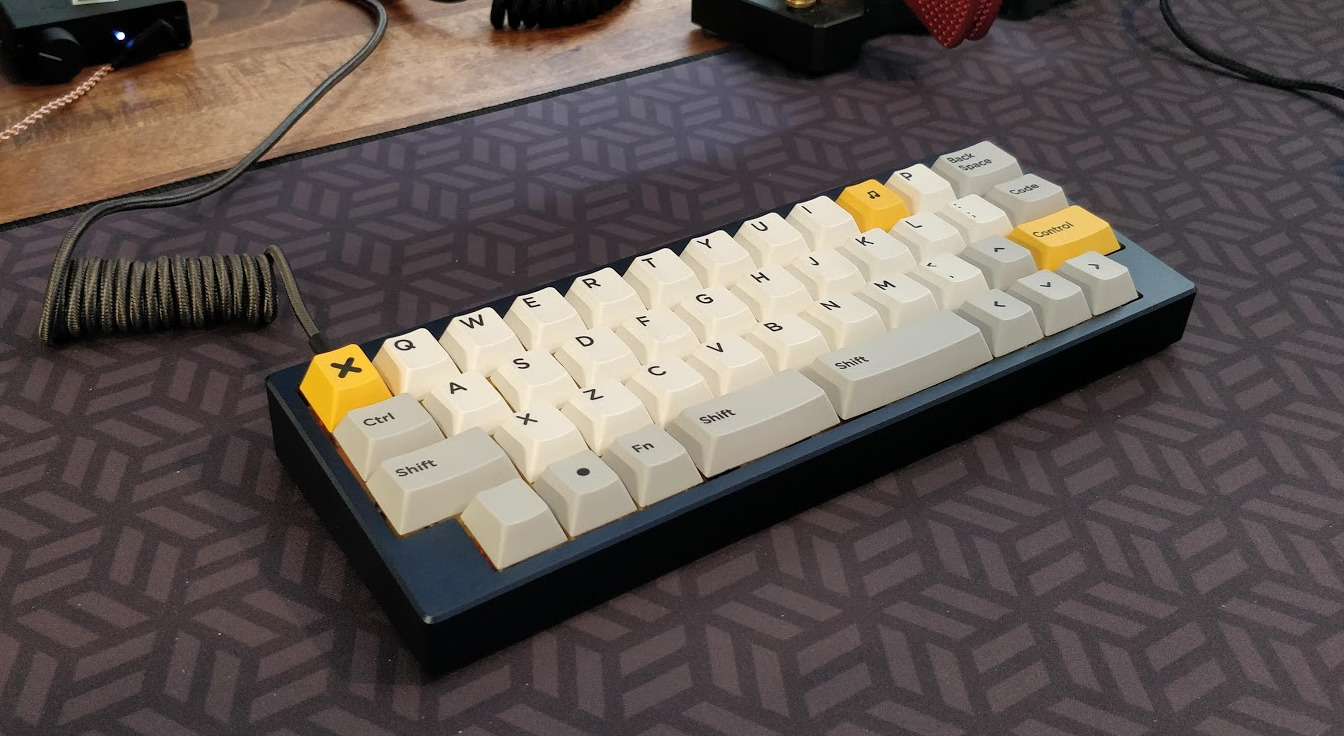
I also have to point out that 40% keyboards don’t have to be all the same and being a 40% doesn’t mean that it has to be ortholinear. This is a photo of a keyboard that while being a 40% it’s still a staggered keyboard.
An ortholinear keyboard is one that has a grid style layout, just like the numpad in a full sized keyboard, the more popular ones are normally arranged in a 4x12 grid but you can find them in a variety of layouts.
If we take a look at the keyboard we can observe that it’s designed so that every key is at most 1 key away from your fingers resting position at the home row. The bottom row is supposed to be used mostly with the thumb, except from those keys at the end of each side. The top 3 rows are the ones that hold alphanumerics and some other mods, we’ll take a look at my layout later. The interesting part about this layout is that it gets rid of the horrendously huge spacebar and puts in more keys that can be used as new modifiers, for example, we can make the top row numerical like in a standard keyboard, we can have a numpad layer to emulate one we could have on a full sized keyboard.
Stuck in the times of typewriters
We can argue that an ortholinear keyboard is not really ergonomic by itself, and that would be true. But at the same time, being stuck on a keyboard layout invented to slow down people typing on typewriters more than a century ago isn’t the best solution either. It’s true that it’s not exactly the same layout, but the current keyboard layout is heavily influenced by the popular IBM keyboards from the 70’s that are mostly an adaptation to modern computers from typewriter layouts.
After all this time I’ve been using a 40% keyboard, typing on it feels like home. Whenever I have to go back to a full sized keyboard a lot of keys feel so far away it even hurts to try to reach them (backspace 😩).
Qwerty is also something that I feel is wrong with standard keyboards, I still type on it and I really think I should move to Colemak someday but it’s something that requires a bit of time to get back to productive levels of typing so I have yet to find some time to fully go for it.
One of the biggest downsides to standard layouts is how much work it puts on the pinkies. The pinky is the weakest finger but for some reason it’s supposed to hit the farthest keys and held modifiers for large amounts of time. Meanwhile, the strongest finger, the thumb, only has the huge space key at reach. Both thumbs for a single key is just not optimal.
Traditional keyboards have one key for each function, and that’s what it makes them have so many keys to fit every single function available. 40% keyboards on the other hand take advantage of the different ways you press a key to fit a lot more functionality on a single key. Keys either have a tap or a hold function, if you type a letter you only tap the key once and for a short amout of time. But with shift for example you have to hold the key to make it function. Taking this into account you can merge different keys into one. I myself have the space key act as a layer modifier when held and as a normal space character when tapped.
How does an ortholinear keyboard solve my problems
Right now I’m mostly happy and comfortable while using my keyboard, some of it is because I feel like I’m using a more comfortable layout but most of it is having a fully programmable keyboard. Having to adapt to a given keyboard layout is not fair because people just have different preferences, different needs. I really feel like the keyboard industry is riding a wave of stagnation and laziness regarding our daily tool. Most people don’t want to learn new ways of doing things, but it shouldn’t be the norm, or the only option.
I’m sure that if you’re a taxi driver there are a lot of cars to choose from that better fit your needs. If you’re a cook you probably have your own tools that fit your way of working… You get the point.
This keyboard isn’t necessarily the solution, but it really enables me to have a comfortable workflow while having to type at least for 8h a day.
My layout
My layout has changed a bit since my last post, but I mostly tried to port it back to the 65% keyboard. I’ll probaly make some tweaks here and there but I’m mostly sure I’m on my endgame layout. I also have to point out that I got a planck keyboard for work and have a full grid layout on it. Layout is exactly the same except I shift the backspace key to the left of the space one more key to the left, so it acts as backspace when tapping and lower when held.
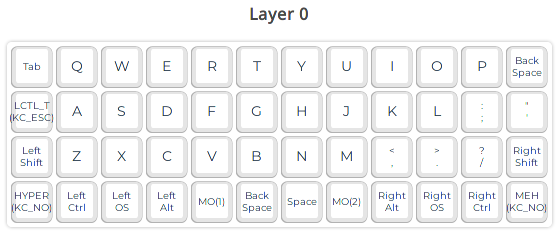
We mostly have a standard qwerty layout, with a few changes to better fit my
needs. I use vim as an editor so having an escape key closely available is
something I like, that’s why in place of caps lock I have an escape key when
tapped and a control key when held.
The tab key is a tap based key, so we can actually fit a hold based function
on it. That’s where I fit my numpad layer that we will later take a look at.
The space key is also a tap based key so I put a movement layer there, it’s
the last layer we will take a look at.
The bottom row corners had nothing on it so I decided to put a Hyper and a Meh
key, which simulate hitting ctrl+shift+alt+gui and ctrl+shift+alt
respectively without having to hit all those keys at the same time. Those key
combinations are not normally used for system shortcuts so I have them assigned
to change workspaces, move windows around, screenshot shortcuts… Those two
keys are kinda hard to hit with pinky fingers so I instead use the edge of the
palm of my hand to hit them.
The keys named MO(1) and MO(2) are usually called lower and raise
respectively and are supposed to activate layers that held keys to represent
numbers and symbols that are missing by not having a physical number row. I know
most people have them switched to what I used but I use them this way so that I
can easily hit numbers when playing games on wasd or qwer.
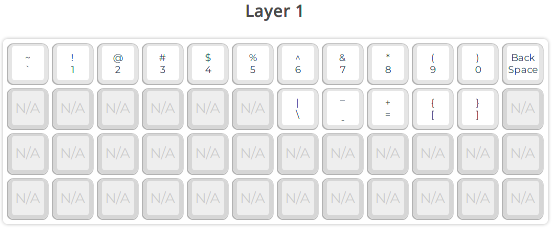
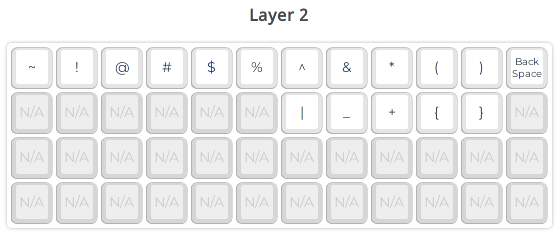
In my case the logic behind lower and raise was the following. The lower layer
holds all the characters that in a key are normally printed on the lower part of
the key. And the raise layer holds all the shifted variants of character on the
lower layer, that are normally printed on the higher side of the key. To get the
number 6 we would have to hit lower+y, y is the 6th key if we start counting
from q. To get the caret on the other hand we would hit raise+y.

And here we have a photo of both lower and raise layers.
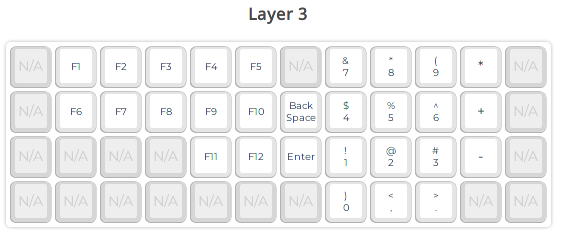
We can now take a look at my numpad layer, it holds a standard numpad where my right hand rests so I can use it without even having to move my hand. I have also chosen to put my F-keys in this layers as I don’t use them that much and I’m already used to their position.
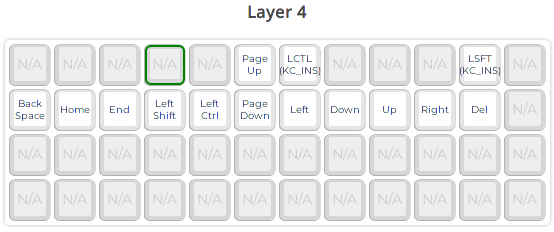
And lastly we have my movement layer, this layer aims to facilitate what arrow keys normally do without having them a million kilometers away from my normal position. I’ve chosen to have the arrows vim style but you can see how useful this layer can be compared to the stardard way of using arrows.
Conclusion
This is the end of my post, hope you liked it. My interest with all of this comes from me wanting to improve my workflow and feel more comfortable in my work environment. This is not meant to bash on people using standard keyboards, just a reflexion trying to show how we have alternatives to what’s normally presented to us and to try to get people to know this world of 40% keyboards.